The bedspread is a household item that not only warms the household during bad weather, but is an important element of the decor, which is responsible for the comfort and tranquility of the atmosphere in the house. Therefore, it is important to take seriously the choice of bedspreads.
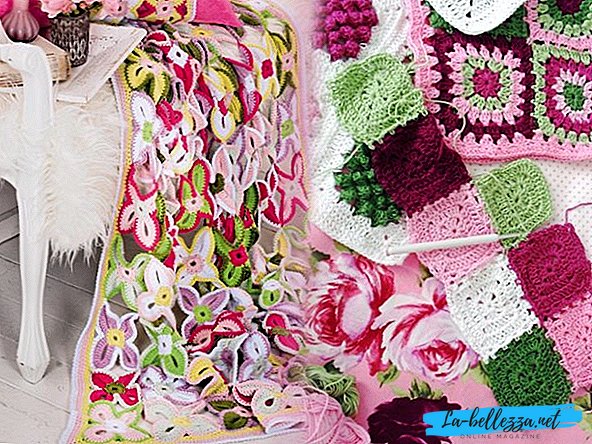
The best option would be to tie a blanket with your own hands, taking into account the peculiarities of the interior of your home and the taste preferences of the household. This can be done with knitting needles, tying, for example, a beautiful blanket, and you can tie a crochet bedspread. In the second case, you get a very original product with a beautiful effect of openwork.
Knitted crochet bedspread with diagrams and descriptions
In magazines and websites, we find different patterns for knitting blankets, but choosing a product for a house is based on certain criteria. It is necessary to knit a blanket in accordance with the style of the room, the design of the sofa or bed, taking into account the color scheme of the room and the tastes of the people who spend the most time in it.
It can be a blanket for a newborn - it requires special attention to the selection of knitting patterns and yarn, and maybe a “duty” blanket in the bedroom, living room or guest room. In general, there are many styles of knitted coverlets, as well as ways of knitting them. In the end, it all depends on the desire and imagination of the master.
Consider some of the many patterns of knitting crocheted, and examine in detail the descriptions of the course of work so that during knitting there are no problems, and the needlewoman can enjoy the process and delight in the result.
Knitting from squares

Nice looking style patchworkseems to never go out of style. It is still used with pleasure in the design industry, because any inclusion in the interior instantly adds comfort to everything around. This effect can be achieved, among other things, by crocheting openwork motifs of various forms. Consider a simple version of how you can create a crochet cover from squares.
Covers sizes:
148 x 116 cm
Materials for work:
- Liska yarn (50% natural wool, 50% polyacryl; 80 m / 50 g) - 650 g beige, 250 g white, 200 g bluish-green and 100 g color. rosewood;
- Maya yarn (63% polyamide, 37% natural wool; 130 m / 50 g) - 100 g each of white and blue-green and 50 g dark pink;
- Mila yarn (70% polyacryl, 10% wool, 10% alpaca wool, 10% polyamide; 100 m / 50 g) - 100 g of sand and 50 g of white;
- hook number 5.
Knit patterns for bedspreads.
Square under the scheme

Run a chain of 8 vp and close it into the ring with the help of 1 conn. Art. Knit acc. crochet pattern knitting pattern in circular rows. Each circular row to begin with the initial ce according scheme and finish 1 connection. Art. in the last initial vp or 1 tbsp. s / n, respectively. Run 1 time 1-6th circular rows, observing the alternation of colors. To do this, secure the new thread with the help of 1 con. Art.
The sequence of bands 1
On 2 circular rows with a beige Liska thread, a sandy Mila thread and a Liska beige thread.
The sequence of strips 2
By 2 circular rows of blue-green thread Liska, Maya and Liska.
The sequence of bands 3
2 circular rows of thread col. rosewood Liska, dark pink Maya thread and thread col. rosewood liska.
The sequence of strips 4
By 2 circular rows of white thread Liska, Maya and Mila.
Grid pattern in circular rows
Alternately 1 tbsp. с 2 / н, 1 в.п. Each circular series start with 4 initial ce. instead of 1 st. s 2 / n and finish 1 connection Art. in the last initial vp
Knitting density
- 1 square = 16 x 16 cm;
- 19 p. X 5,5 p. = 10 x 10 cm, connected by a lattice pattern.
Pattern

Working process
Run 25 squares acc. sequences of colors 1, 9 squares acc. sequences of colors 2, 6 squares acc. sequences of colors 3 and 8 squares acc. color sequences 4.
Assembly
Expand squares acc. pattern 1 (= 6 x 8 squares) and from the front side, connect freely across, then lengthwise using comp. Art. beige thread Liska.
For the border, start with a new Liska beige thread and tie each 2 circular rows with a beige and white Liska thread and 1 circular row with a beige lattice thread, while in the 1st circular row at the corners on both sides of the corner st. with 2 / n to perform 2 vp and in each of the following round-robin rows, perform at 1 c. more. In the last roundabout run 3 tbsp. with 2 / n in the corner loop.
Then connect another 1 circular row with "waves" (= * 1 Art. B / n, 1 Art. S / N, 3 Art. C 2 / n, 1 Art. C / n, from * constantly repeat, end 1 connection. Art. 1 st. b / n).
For a newborn

The smallest children deserve special attention and care, so it is important to surround them with not only beautiful, but also useful things. Such products and need to create their own hands. For example, you can crochet a bedspread. It is useful both for a crib of the child, and for a carriage.
Intended for newborns things it is important to knit from soft soft warming yarn, which at the same time will not irritate and soar the skin. This moment should not be overlooked when choosing materials for work.
Let's take a closer look at how to tie a blanket for a newborn crochet, and at the same time a beautiful pillowcase on a pillow for a baby. Knitting style bedspreads - beautiful multi-colored triangular crochet motifs.
Covers sizes:
- the cover is about 66 x 66 cm;
- pillow cover - about 20 x 24 cm.
Materials for work:
- yarn (50% viscose, 50% polyacryl, 106 m / 50 g) - 200 g sulfur, 100 g orange and 150 g pink;
- hooks number 4 and 4.5;
- pillow 24 x 20 cm.
Knit patterns according to the schemes.
Bars without nakida
Each row starts with ce. rise instead of 1st st. b / n and end the connection. Art. in ce lifting.
Triangles

Knit according to the scheme, circular rows begin and end, as indicated in the diagram.
Repeat from the 1st to the 4th row, while in the 4th row the parts are interconnected, as described below.
Half triangle
Knit according to the scheme, rotate the rows, as indicated on the diagram.
Repeat from the 1st to the 4th row, while in the 4th row the parts are interconnected, as described below.

Knitting density
- 16 p. X 20 p. = 10 x 10 cm, Art. b / n crochet №4,5;
- side length of one triangle = 12 cm.
Pattern

Working process
Cover
1st reg .: tie 5 pink triangles with crochet number 4.5 and spread out next to each other with the same side down.
2nd R.: in the gap between two pink triangles, tie along a gray triangle, and in the 4th row from two sides, along the line from arrow C to A and from arrow A to B, connect them with pink triangles. To do this, in each arch vp instead of the average ce knit 1 Comm. Art., as well as to the right and left of single art. s / n between two ce knit 1 Comm. Art., introducing the hook into the adjacent triangle. Then, on both outer sides, knit with a gray thread on the half of the triangle and in the 4th district. on the one hand, from arrow A to arrow B, connect in the same way with pink triangles.
3rd reg .: bind with orange thread 4 triangles and 2 halves of triangles and in 4th p. / Circle.r. on one side of whole triangles along the line from arrow A to B and halves of triangles along the line from arrow C to A connect with gray triangles.
4th b.: Between two orange triangles, tie in 1 gray triangle and in 4th p. from two sides, along the line from arrow C to A and from arrow A to B, connect with orange triangles.
5th river: to link 5 pink triangles and in the 4th circle. on one side, along the line from arrow A to B, connect them with gray triangles.
Repeat from the 2nd to the 5th row, and then from the 2nd to the 4th row.
Assembly
Cover the veil around the perimeter with crochet No. 4 with pink thread 4 krug.r. Art. b / n and 1 p. "rach'ogo pitch" (= 1 tbsp. b / n from left to right), while in the 1st round. on each whole triangle, perform 19 art. b / n, and on each half of the triangle - 15 st. b./n.in the corners of the blanket always knit 3 tbsp. b / n
Cushion cover
Case crochet number 4.5 and connect the triangles with each other, as described above.
1st p .: perform 4 gray triangles and spread out next to each other with the same side down.
2nd river: make 4 orange triangles and connect each triangle in the 4th row from two sides with gray triangles, while the 4th orange triangle will be connected on one side with the 1st gray triangle so that you get a ring.
3rd R.: to connect 4 triangles of gray color and in the 4th circle. connect them from two sides with orange triangles.
4th river: connect 4 pink triangles and, as described above (for 2nd river), connect with gray triangles.
Assembly
Run the upper seam. Open edge tied with gray thread in one row of Art. b / n, while on each triangle to knit 19 st. b / n Insert the cushion into the boot and complete the remaining seam.
Cover of motives for the big bed

Of course, nowadays there are different standards for bed sizes and bed covers for them, so it will be difficult to choose something specific for individual needs. But since knitting blankets, blankets and covers on the blankets - the work is flexible, you can always add the necessary or reduce the excess to the final result, try to crochet the cover on the bed. The scheme and the description of knitting of a crochet of motifs will help in this. This veil knits with very large openwork motifs in combination with smaller ones.
Covers sizes:
About 140 x 175 cm
Materials for work:
- yarn (100% cotton, approx. 140 m / 50 g) - approx. 950 g lilac melange;
- hook number 4;
- optional - pieces of lilac felt for decoration.
Motif knitting scheme


Working process:
First link 12 motives II. Then link 20 motifs I, while in the 10th circle. connect them at the picot, indicated by arrows in the scheme, with the help of 1 conn. Art. with motives II, as well as among themselves.
In width, make 4 motives I and 3 motives II, 5 motives I and 4 motives II in height, connecting them together.
Assembly
In the middle of the motives II, as shown in the photo or arbitrarily, sew in the decor of felt.
How to tie a blanket for a children's sofa

When you come to knitting a blanket from the creative side, you will definitely get an exceptional product that will appeal to both adults and children. Decorating a children's room with a knitted coverlet, it is worthwhile to take care of the selection of interesting textures and the combination of colors - so the children's room will immediately change. Let's take a closer look at how to crochet a baby blanket on a sofa, which is perfect for a girl. This openwork bedspread will consist of round motifs with flowers.
Covers sizes:
About 160 x 128 cm
Materials for work:
- yarn (96% cotton, 4% polyester; 105 m / 50 g) - 800 g blue-gray and 700 g blue;
- hook number 4.
Knit patterns according to the schemes.
Socket

From the blue thread, fold 1 loop and knit according to the pattern in circular rows. Each circle row start with ce. according scheme and finish 1 connection. Art.
Run 1 time 1-7th circular rows acc. sequences of colors.
Sequence of colors
1 circular row of blue thread,
2 circular rows of gray-blue, blue and gray-blue thread.
A circle
From the blue-gray thread add 1 loop and knit st. b / n in circular rows. Each circular row start with 1 additional initial ce. and finish 1 connection. Art. in the 1st st. b / n circular row.
1st round row: 8 tbsp. b / n
2nd circular row with a blue thread: double each loop = 16 p.
3rd circular row with gray-blue thread: double every 2nd loop = 24 p.
4th circular row with blue thread: double every 3rd loop = 32 p.
5th circular row with gray-blue thread: double every 4th loop = 40 p.
Knitting density:
- socket = diameter 16 cm;
- circle = diameter 6 cm.
Pattern

Working process
Run 80 outlets and 63 laps. We recommend first stretching or lightly stripping sockets and circles.
Sockets acc. sew the patterns along the marked edges A. Then sew circles into the holes along the edges B.
Video tutorial for beginners
Starting a job more confidently to any novice knitter will help video master class. Visual lessons from professionals will facilitate the process of getting used to working with a crochet and help to avoid the possible mistakes of beginners.
Crochet crochet video tutorial: