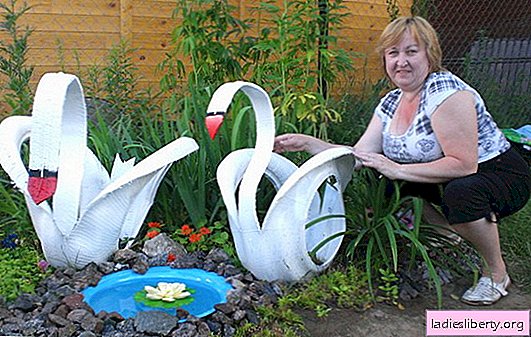
In connection with the beginning of the vacation season, I bring to your attention wonderful swans, which you can easily do with your own hands.
Homemade swans will perfectly decorate your site and bring a lot of joy to you and your loved ones.

DIY swan. Let's get started!
To make a swan we need:
• Car tire;
• Screws and bolts for fastening parts;
• Durable stiff wire for the frame of a swan or an elastic rod;
• Chalk (you can use ordinary colored crayons);
• Ruler;
• Ideally, you need an electric jigsaw, but a very sharp knife will do;
• Electric drill;
• Paint white or black (depending on the color of your future swan) and red - for the beak;
• Building brushes;
• Garden collar (optional).
Do-it-yourself tire preparation for making a swan
First you need to prepare the tire itself a little. In order for us to succeed, you must first wash and dry it. To create a swan, it is best to prepare a workplace in the fresh air and in the sun. After your workpiece is completely dry, take crayons and draw a tire, carefully considering the location of the neck of the wings and tail.
To give you an idea of what the neck, head and beak of a swan should look like, I will give you an example of a already cut tire.

Keep in mind that this is just an example, you can come up with your own swan, which no one else will have!
The length of the neck of a classic swan should be at least half of the entire wheel (about 95 cm.). The length of the beak is about 9 cm, and the head is 10 cm. The tail is somewhere 40-50 cm.
It is worth adding that if you want to make your swan a voluminous and more realistic head, then it is better to draw it a little wider. So, the drafts are ready!
The next step is to take an electric jigsaw or an ordinary sharp knife and begin to cut all the parts strictly along the contour. You need to work slowly and smoothly, because the main thing in a swan is symmetry. If your hand suddenly trembled, or for some other reason you cut the tire in the wrong place, then you should not worry, there is super glue. He will fix it. But still, you should not allow such accidents. Next, we make cuts along the tire where the wings should be and bend them to the sides for greater credibility. Just do not overdo it and do not break through the tire. Your body is ready for your swan.

But this is not the end, because if we stop at this stage, we will have to endlessly support the little animal so that it does not fall. You need to prepare the frame. It was for these purposes that the wire was needed. Only the wire should be very solid, otherwise it will not work, and the swan will roll from side to side. If you did not find such a wire, then you can replace it with an ordinary flexible rod or a narrow metal plate. The length of the wire should be about a meter and a half. To securely fix the wire on the inside of the tire, you will have to use screws or bolts.
Add a little more credibility and volume to your swan with a drill. It is only necessary to make two symmetrical holes in the head and tighten them with a garden clip. For embossed eyes, you can also use screws. The main thing is not to forget to color them, otherwise they will be barely noticeable.
DIY swan painting
Only after the swan has acquired its usual appearance and a beautiful pose, you can start painting. First you need to prepare the territory, since, it will not be very pleasant for you to look at the lawn multicolored from paint. To avoid such unpleasant things, you need to cover the workplace with newspapers in two layers before work.
Well, now that the territory is prepared, you can continue to work. By the way, it’s quite easy to colorize a black swan, which cannot be said about white! To paint a regular black tire without bald spots, you must apply at least three layers of white paint. As a working tool, a construction brush will be most suitable. It is very easy and quick to paint over all the scars of the tire. After painting the swan, it’s better not to touch it for at least a day, but rather two, until the paint is completely dry, so as not to ruin your creation. If you plan to use the swan the next year, then you will need to cover it with varnish, otherwise in the rain your snow-white swan will turn into an ugly gray duckling. Varnish will help maintain the appearance of the swan for many years. In principle, this is your job finished, it remains only to put your swan in the garden. You can stop at this stage, or you can go ahead and make a couple more swans by placing them in an artificial pond!
It is worth noting that this is only one of the variations of the swan, which can be done with your own hands. If you liked it, then you will not disregard others. Here are some more examples.
Homemade swan in the pond
To make a swan in a pond we need only one more wheel. Paint the tire blue and carefully place the swan in the wheel. For greater reliability, you can fix it with glue. That's all! You’ve got a do-it-yourself swan on a wave, which is now not afraid of anything.
DIY swan flowerbed
To diversify your garden a little more, you can make a real flower bed out of your ready-made swan. Just put a tall pot of bright flowers in the middle of the swan. Such a flower bed will look great in flowers and will fit into absolutely any garden.
Tire swan is a universal and anti-crisis decoration for the garden. I hope that you will never again have the desire to throw the tire out, knowing which swan you can make of it.