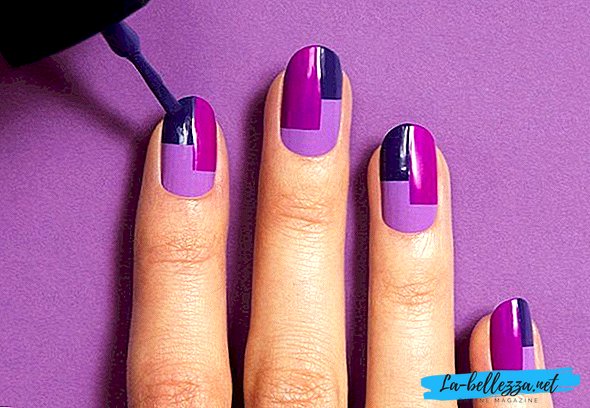
More and more women of fashion cease to visit the manicure masters in the salons. Make a high-quality and bright manicure at home is no longer a problem. To date, a huge amount of tools, materials and tools that help simplify the procedure for creating a manicure. Now it is not necessary to study for several months. It is enough to acquire the necessary stencils and stickers, as well as tools, and master the simple technique of applying gel varnish at home.
A big disadvantage of home manicure was its fragility, but with the advent of gel polishes, a manicure can be worn for more than two weeks. It should be noted that many girls gel polish called shellac, but this is a mistake. Shellac Gel Polish - produced by CND, this is an expensive original product for a professional manicure, which consists of an organic polymer, respectively, the other non-original products are not Shellac.
Gel varnish combines the properties of 2 products for nail design - the usual varnish for manicure and modeling gel. Under the influence of UV waves, they polymerize to form a dense film, i.e. there is a transition from a liquid to a solid state.
Preparation of tools

In order to bring your nails in order and do an interesting manicure at home, you need to prepare certain tools and materials. It is better, of course, not to choose the cheapest, otherwise a number of problems may arise and will eventually come out more expensive. Everyone knows the saying "miser pays twice." It is recommended that you carefully review the characteristics of the purchased tools and customer reviews. Next, tell you what you need tools for home manicure.
UV lamp (ultraviolet lamp) for drying nails. Nowadays, 36 watt lamps are used mainly in beauty salons and at home. They allow you to speed up significantly the drying process up to 1-2 minutes. Some have a built-in fan, but this is not a mandatory feature. The price range varies from 1,100 rubles to 7,000 rubles. There are also economical options of 9 watts up to 1000 r, but they dry up one element much longer.

Manicure setwhich includes scissors, wire cutters, double-sided cuticle pusher or orange sticks.

Polishing file - buff with hardness from 900 grit. Such a nail file polishing nail plate to improve the quality of adhesion to the gel varnish.

Nail polishing files more often chosen in the form of a boomerang. Here the gradation of stiffness (grit) is important. For natural nails preferred files with high abrasiveness, at least from 500 and above. For extended, they take more granular files from 100 grit to 180. 4-sided files are very convenient. They are used for grinding and polishing.

You can purchase inexpensive manicure milling machine with various nozzles for processing nails. Simple devices are suitable for the house, the price of which ranges from 1,700 rubles to 5,000 rubles. Power ranges from 18,000 to 25,000 revolutions per second. Professionals use devices with a capacity of 30,000 revolutions per second. The most popular brand is Strong.

Thin lint-free napkins necessary to remove excess material or sticky layer after drying.

Necessary materials

When all the basic tools are purchased, you should proceed to the purchase of materials. It is also important to consider the various brands of manufacturers and get acquainted with consumer reviews about the quality of materials. Next, we will tell you what materials are needed for home manicure.
A set of colored gel polishes and glitter, including white, black and nude. It is possible to consider domestic manufacturers of manicure products RuNail or Aurelia, but there is already a persistent recommended list of inexpensive and high-quality gel polishes. These include: Kodi Professional, Laque RuNail, Pnb (Professional Nail Boutique), Canni, Bluesky, Nogtika and Red Carpet Manicure.

Scotch to create geometric shapes and jacket, stamping, stencils, glitter, rhinestones, etc. You will also need a set of brushes with natural bristles of various diameters for applying the picture and attaching rhinestones.

Degreaser or dehydrator needed for pre-treatment of nails and for removing the sticky layer after drying.

Primer - means for processing the nail plate in order to eliminate the natural fatty layers and dirt to improve adhesion. It softens the horny particles and the base coat adheres better. They are divided into acid and acid-free.

Base - a layer for alignment of a nail plate. It is divided into the usual, rubber (used for strong defects of the nail plate) and vitamin (for dry and brittle nails).

Remuver Used to soften and remove cuticle and dead skin cells.
Topcoat (top) - it is put as the finishing and fixing layer of manicure after the end of all manipulations.

Cuticle oil necessary to protect the skin near the nail plate. It is applied after the completion of the manicure. It is possible to replace with any other nutritious oils;
Special softening liquid for removing gel polish and foil also useful.

Step by step instructions for applying gel polish

When everything is acquired and prepared, you can proceed to the coating gel varnish at home. At first glance, it seems that this is a very laborious process, but after several procedures, you will quickly be controlled and sharpen your skills as an art designer. On average, the procedure takes from 15 minutes to an hour, depending on the complexity and condition of the nails. The procedure of applying gel polish can be divided into 7 basic steps.
Nail preparation
Step 1 - nail preparation. In order to start creating a manicure, nails are required to prepare. To do this, you need to steam in the hands of the bath or use the remover to remove excess skin around the nail. Then, using a nail file, give the necessary shape to the nail and buff it with buff, not forgetting to work the edges and the base of the nail plate.

Nail pretreatment
Step 2 - preparatory surface treatment. For surface treatment, a nail file is necessary. It mattes the nail, eliminating gloss that prevents adhesion to the coating layer. This process is very important, because if you miss it, gel polish can crack and break off after a few days. After the nail becomes matte, it must be wiped with a degreaser. It is necessary to ensure that after this procedure, you do not touch the plates with your fingertips. Then, a primer is applied in a thin layer.

Base coat
Step 3 - the process of applying the base layer. It is important to note here that after the primer has been applied, it is impossible to pause more than 10-15 minutes between this layer and the application of the base. The base layer is applied with a thin layer, trying to prevent contact with the cuticle and other okolonogtevuyu tissue. Well process the end parts of the nail, so that they do not remain "naked."
The base layer is applied to all fingers except the thumb and then dried. In a 36-watt lamp about 2 minutes. After this, the thumb is separately processed and dried. After drying the nails, it is necessary to remove the sticky layer with a degreasing agent.

Color coating
Step 4 - applying a color coating. Apply the selected color gel polish is also recommended with a thin layer. If something has fallen on the periungual zone, it is necessary to carefully remove the orange stick. Color gel polish is applied according to the same pattern as the base - first 4 fingers, except for the big one, and then drying. Paint the thumb and dry for about five minutes. If the color is not evenly distributed or the layer is not the same saturation as you would like, repeat the manipulation one more time.

Nail design
Step 5 - decorating nails. Stamping, water-based stickers, rhinestones and freehand drawing is applied at this stage. The process takes a minimum amount of time, and any of the techniques does not require special skills.
To attach rhinestones It is recommended to dip a toothpick into a transparent varnish and then with a tip attach a decor element to the nail. Thus, paste the rhinestones one by one.

To use water-based stickers, cut out the drawing on the shape of the nail or a necessary element and soak it in water as indicated in the instructions. Usually no more than 10 minutes. Then the picture is wiped and removed from the substrate, spreading it over the nail.

To use stencils, they should be applied to the nails and smooth. Then, each stencil element is drawn with a colored gel polish with a brush and dried. After removing the stencil.

To use the stamping, it is necessary without much pressure to transfer the desired pattern to the stamp, rolling it over the plate, and removing unnecessary details, and also, without strong pressure, transfer the pattern from the stamp to the nail.

To use scotch, it is necessary to stick it so as to separate certain areas for dyeing in other colors.

Finishing coat
Step 6 - applying a finishing or fixing layer. The top layer allows the manicure to last longer, and also gives it a beautiful glossy sheen. It is recommended to apply two finishing layers, staining and the inside of the nail as well. Each layer is dried in the lamp for about 2 minutes. But, you can apply and once.

Final stage
Step 7 - Remove the sticky layer. It is removed or degreaser or dehydrator lint-free napkin. Excess gel polish, which stands on the sides, also must be removed with an orange stick or dot. After that, oil the cuticle.

As a result, depending on your preferences, you get a beautiful and neat manicure, for which you would have to pay dearly to a specialist in the salon.
 Scotch Manicure
  Reverse french with scotch
Gel polish removal
 It is important to know how to remove old gel polish. Regular acetone or nail polish remover will not remove it. In order to remove the gel polish will need: foil, a special tool for removing gel polish and cotton pads.
Cotton pads are divided into 4 parts, each moistened with liquid to remove gel polish, applied to the nails and wrapped in foil for half an hour. Over time, the foil is removed and the remaining varnish is removed with an orange stick. If the coating moves away badly, it is necessary to perform the manipulations again.
Major mistakes

You need to know that when preparing the nails are the most important mistakes which affect the quality of the coating and the time of wearing gel polish. They are as follows:
- An incompletely removed old coating prevents the new coating from lying flat;
- The formation of bubbles in the base layer due to poorly removed cuticle. Because of this, a new coating will crack and peel off at the base;
- Improper buff polishing can make the nail plate smooth instead of a rough surface that helps the adhesion to the coating. Gel varnish will not stick on a smooth surface;
- The gel polish will peel off or split off if the nail plate is poorly degreased or the primer application step is missing;
- Sometimes the nails suffer from drying out, due to the use of improperly chosen products for processing before applying gel polish. On such nails, it will immediately crack;
- If the nail plate is thin and strongly bends, either a length correction or preliminary strengthening of the nail is required, otherwise chips and cracks cannot be avoided;
- If, during drying, to keep fingers tilted, then polymerized flows may appear;
- It is impossible to apply the coating too thick, it will not dry, but instead there will be nodules and other defects;
- Coating problems may also occur if the materials are of poor quality;
- If you do not seal each of the applied layers, then peeling is inevitable.
Reasons why gel polish does not hold

The procedure of applying gel varnish for beginners seems to be difficult, but in fact, having tried several times by trial and error, the technique improves. Often, newcomers ask questions about why gel polish does not hold well, cracks behind. To prevent this from happening, the masters recommend carefully and carefully follow all the steps for applying, without losing a single one.
Gel polish does not hold for a number of reasons:
- Old coating not completely removed;
- Cuticle not completely removed;
- The nail is badly defatted;
- Missing primer application step;
- Nail incorrectly polished buff;
- The applied layer is too thick;
- Some of the layers are not sealed;
- Poor quality material, or mixed materials of different quality.
It is important to know that gel polish does not hold on weak and brittle nails. If you have fragile, brittle nails, you need to strengthen your nails before starting the procedure of applying gel polish at home.