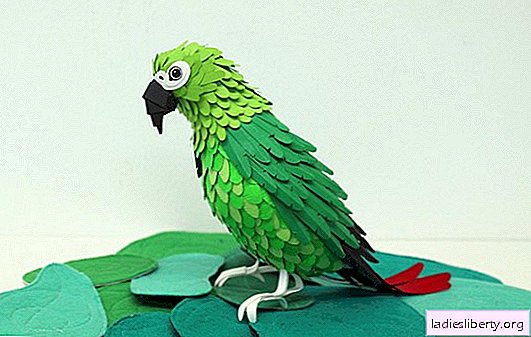
If you want to have a parrot at home, but there is no way to look after him daily - you can do it yourself and get visual satisfaction.
Exotic bird must be bright and colorful.
Looking at such a craft, thoughts will themselves fly away to southern countries.
DIY paper parrot
Craft such a parrot is desirable in the company of children. Fun lesson. No more than 2 hours of the day off will be spent on its manufacture.

The following materials will be required: colored paper in all colors of the rainbow, white paper of A3 format, compasses, pencil, ruler, scissors and glue.
Step 1
The body of a parrot is made from a large sheet of white paper with your own hands. The sheet is folded and glued. A strip of 8 centimeters is cut from the top. This can be done before using glue in the work.

Step 2
Feather cutting. For this, 4 colored sheets of paper are taken, as indicated in the figure. Stripes are cut out of them, which are bent into an accordion. This is done to save labor when you can cut several feathers for a figure at a time. When the folded strips are cut into smaller parts, the contours of the feathers are cut out. The edges are bent manually up. You can use scissors and try to carefully bend the edges with them. Precautions are mandatory.

Step 3
Feathers are glued on the body of a parrot. They are arranged under a friend in a checkerboard pattern. From the top row and down. You can vice versa, from bottom to top. The row has 10 feathers. It is recommended to visually highlight the center of the breast and glue one white feather.

Step 4
Eye construction. To do this, a circle with a diameter of 7 cm is drawn on paper. To obtain plumage, the paper is cut into small strips, as in the figure. According to the previous scheme, the resulting plumage around the eyes is also bent.

Oval paper for pupils is made of black paper. You will also need small white circles to create a gleam in the eyes.
Step 5
Harvesting the beak. Two rectangles are cut out of red paper, which are cut at the edges, as indicated in the diagram.

Then the corners of the upper beak are glued together so that they both coincide. After that, the finished beak can be glued to the body.

Step 6
Creation of paws. Of 2 pieces of red paper measuring 6/6 cm, the legs are cut out. To give volume, they are slightly bent.

Step 7
Wings. Two bases for wings are cut from a sheet of white paper. Feathers for these wings are made from the colored paper shown in the figure. Feathers are important to bend slightly inward.

It is recommended that the tip of each feather is slightly incised and glued. This will add some volume to the figure of a parrot made by yourself.

All the resulting feathers are glued to the base of the wing.

Step 8
Crest Crest. To do this, three strips of 5 cm wide are cut from green shades of paper. They are cut along the edges into even smaller strips, which are also bent.
The two resulting strips are glued to the crown of the mirror between the beak and the eye so as to form an intersection at the top - cross to cross. The third strip is glued in the center to the visual area of the forehead. She covers herself on top of other strips. The last crest is glued to the rest with glue.
Step 9
Tail. From paper of different colors according to a similar pattern described above, long feathers are made for the tail. And only now the resulting small paws can be glued to the body.
DIY do-it-yourself lovebirds
Quilling lovebirds are a daunting task. Work will take some time. But the result exceeds all expectations. The picture looks like a living one. Friends and relatives will appreciate such a meticulous work.

A ready-made scheme is taken. It can be printed using a printer or redraw directly from the monitor screen.

For the work you will need the following materials: colored paper, scissors, glue, tweezers, pins and panels 15/21 cm. As a panel, it is recommended to use a simple photo frame with a glass built-in inside. This will extend the life of the future picture and protect it from dust.
Colored pieces of paper are cut into thin strips of 3 mm. Each of the strips is twisted and bent neatly into a drop. You can do it manually. You can use tweezers. Work in this technique is more complicated than the previous technique of making a parrot out of paper with your own hands. You may need to get used to the method of properly gracefully curling and folding paper. But these are only temporary difficulties. Paper is a very malleable material.
The resulting modules are glued from the sides of the figure to the center. It is recommended to fix some parts with pins.

The head of the second parrot and the body are raised 3 mm above the surface. The glue layer is bigger here. This gives volume to the image.
The tail of the first budgie is made of strips 1.5 mm in size. And the legs are 1 mm.

The work ends with a background design with flowers and leaves. A strip of colored paper with a pattern is glued along the edges of the frame.