Both adult girls and very little ones like to decorate their hair with ribbons, bows, and hairpins. Of course, you can purchase such accessories in the store. But how interesting, having shown imagination, to do elastic bands for hair with your own hands! Perhaps they will be made of the same fabric as the elegant dress, and make up a harmonious ensemble. And perhaps it will be something bright and creative, emphasizing the individuality of its owner!
What can you do rubber bands with your own hands?
If you have simple elastic bands, the remains of yarn, beads, ribbons, lace, trimmings of various fabrics, then you can safely begin to work.
We will need a few scraps of thin fabric, threads in the color of the fabric, scissors, cardboard, a needle, a large bead or a bright button.
- Cut out two circles of cardboard with a diameter of 7 and 3 cm from the cardboard. We attach patterns to the fabric and cut 10 circles of different sizes: 5 - with a diameter of 7 cm, 5 - with a diameter of 3 cm. If the edges of the fabric are easily crumbled, then it is better to overlay or scorch them with a lighter flame or candles. At this stage, you can choose a fabric of the same color or different, but it should be thin enough to easily assemble into an accordion.
- Fold the blanks in half twice. You should get a sector with a semicircular edge.

- Having retreated 1-2 mm from the semicircular edge, stitch it with a “forward needle” seam.

- Gently pull the basting thread. And with the same thread we fix the resulting petal.
- Sew together 5 petals in one inflorescence.

- Repeat all operations for small workpieces. Combine two inflorescences into one flower. Carefully stitch the core and close the seam with a beautiful button, large bead or sewn on rhinestone. We fix the flower on an elastic band.

To make the next rubber band for hair with our own hands, we need a fabric, scissors, a needle with a thread and a button. Having made a product from the same fabric as your daughter’s summer dress or sundress, you will receive a bright and harmonious ensemble. The process of making such an elastic is quite simple, and your princess will be happy to help you.
- Cut out two rectangles from the fabric (identical or contrasting). The width of one is 8 cm, the other is 6 cm, the length of the blanks is the same - 30 cm. We add the cuts in half with the front side inward and sew the end sides. You can use a sewing machine, or you can sew it by hand.

- Turn the blanks on the front side, carefully and carefully combine the edges. Sew along the perimeter with a seam “forward needle”. The stitches should be made small and, if possible, evenly. The appearance of the product will depend on your accuracy. Carefully pull the basting thread and secure with a few stitches. We got a round blank. We make the same from the second piece of fabric.

- Now we will prepare our buttons. For such a product, the button “on the leg” is best suited. From the fabric we cut out a circle whose diameter is 2 cm larger than the diameter of the prepared button. You can choose any color scheme and make yourself gum parts from the same fabric or from contrast. We sew a circle around the entire perimeter with a stitch “forward needle”. The stitches should be evenly spaced and approximately 1 mm from the edge of the fabric. Try to make them small. Slightly pulling the basting thread, we get a cover. It is necessary to place our button “leg” in the direction of the hole in it. Finally tighten the thread and carefully fix it.

- We begin to collect our gum. On a large round billet, place a small one, aligning the holes. In the center we place a button covered with fabric. We carefully and carefully sew all the details and sew our flower to the elastic.

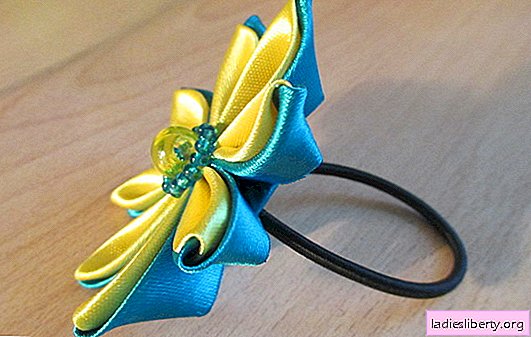
To do the next rubber band for hair with your own hands you will need satin or kapron ribbons of different colors and widths, threads with a needle, scissors, a bead or sewn rhinestones. In the proposed version of the product, 55 cm of a multicolored satin ribbon 2 cm wide and 65 cm ribbon 0.5 cm wide were used.
- We cut a wide ribbon into five segments 6 cm long and five segments 5 cm long. The ends of the workpieces are fired by candles or lighters on fire so that they do not fray during operation.
- We cut a narrow tape into the same segments: five pieces of 6 cm and five pieces of 5 cm each. Gently scorch the ends of the ribbons.
- We fold all the segments in half with the shiny side out. Pieces of narrow tape are placed in the center of the wide. A seam “forward needle” connect parts 6 cm long. We make small stitches and place them at a distance of 1 mm from the edge. We perform the same operation with parts 5 cm long.

- Gently pull the basting thread and fix it. We got two flowers of different diameters. We connect them with a needle and thread, aligning the central parts, but turning a little along the central axis. We add the remaining narrow ribbon in the form of a five-leaf bow and sew it in the center. Close the seams with a large bead or strassik. Sew our bright flower to the elastic - the product is ready.

By changing the size and color of the blanks, the length and width of the ribbons, the shape of the beads, you can create new unique crafts every time. Any girl will be happy with the original bright rubber band for hair, made by my mother’s hands. Now your princess's hairstyle will always be in order.