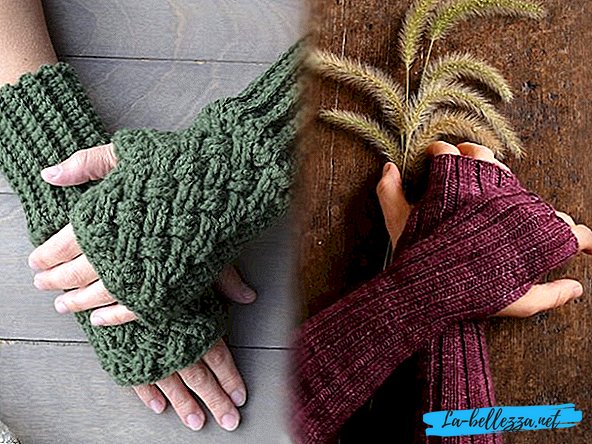
Mitts - comfortable gloves or fingerless mittens, which are successfully combined with almost any style of clothing: from classic to street. There are many models of mitts, among them there is a special type - mitts connected with knitting needles. We will talk about them in more detail in this article.
Knitted mitts are beautiful and comfortable products with an interesting texture, which, depending on the time of year, delight their owners with interesting patterns or openwork, complete freedom of movement and warming heat. They are long and short, delicate or dense, with many beautiful motifs or made with simple patterns. Knitting these beautiful and comfortable products is pretty quick and easy. Well, the most difficult task in this matter is to choose from dozens of beautiful schemes exactly the one you like the most.
Patterns and description knitting needles mitts

To understand in more detail the specifics of knitting needles with mitts, we will consider different ways of working on them, and apply several schemes and descriptions of how mitts are made for adults and children. But first, let's find out how to tie your first mitts with knitting needles - Schemes with a description for beginners will help in this.
Master class for beginners
In order to learn how to knit mittens with knitting needles for beginners, a master class for knitting mitts with knitting needles is useful. Consider the step by step version of knitting mitts with a wedge under the thumb, which fit on five knitting needles. Beginner knitters better first thing to knit mittens for themselves, so that at any time you can try on the product and, if necessary, correct the number of loops.
At the very beginning, we measure the girth of the thumb and the girth of the palm above the thumb. We consider the density of knitting and the required number of loops for the initial set of forearm girth (number round a multiple of four).

Materials
- Natasha yarn (95% wool and 5% acrylic, 250m in 100 grams);
- Needles №2,5.
For example, cuffs fit on 44 loops, with a transition to 40 loops to the palm. The number of loops is adjusted according to the parameters.
Working process
On two spokes put together we will collect the necessary number of loops in the usual way. After the 44th loop, a locking “tail” is tied with a small thread on the main thread.

Next, knit an elastic band 1 × 1 according to a simple scheme: 1 front, 1 purl. In order for the circular pattern to look good, and the pattern is not distorted diagonally, we knit the front and back loops in the classical way - behind the front wall.

Having knitted 11 loops, we leave this knitting needle and take another one. Knit 11 more loops. Thus, when we reach the end of the row, we will have 4 occupied needles, on each of which there are 11 loops. And the fifth needle - free, working.
The numbering of the needles is performed starting from the one on which we knit the loops first. It is easy to learn it - there remained the "tail" of the thread from a set of loops.
 The arrangement of the needles № 1,2,3,4.
We knit a rubber band 1x1 up to a height of about 5 cm. At the junction of the first and last (No. 4) knitting needles, an ugly place turns out (photo 1). It is masked with a hook and thread from the "tail" of a set of loops, which is stored at the very beginning after tying. This is how this area looks after camouflage (photo 2).

When we knit in a circle, we see the front of the thing in front of us and we can follow the pattern quite easily. After 5 cm of gum, we need to go to the main picture and reduce the number of loops to forty.
On the needles No. 1 and No. 2 we will have the upper part of the mitts, and on the needles No. 3 and No. 4 we will have the lower part. The bottom, the one that falls on the back of the hand, knit only facial. And for the top, you can take a simple "double rice" pattern.

The first row after the elastic on knitting needles is knitted only with facial ones, and the last 2 loops on each knitting needle are knitted together. Thus, the number of loops is reduced to forty, and the needles now have 10 loops each.
Further, on the needle number 1, 2 facial lines are connected in a row - this is a reserve for the future wedge. The drawing itself is also an alternation “1 front - 1 purl”, but with a shift along the rows. Two rows - loops on top of each other, then a row: above the front - purl, above the purl - facial. Row - again according to the drawing on each other, and again offset.
Knit 3-4 rows, and proceed to the "wedge". Its basis is the second loop on the needle number 1. In the row where we start to increase, we knit the first loop, we nakid, we knit the second, and one more nakid.
 The designations in the photo: 1 - "the basis of the wedge"; 2 - nakida to the right and to the left of it.
 - type of nakida used below. They must be such that when knitting in the next row in their place did not form a hole. Since we knit with facial classical ones, the nakida will look like the one shown in the figure.
Next knit by drawing. On the next row we knit nakida front, on the first spoke now two loops more. Another row in the pattern, and then adding again - we knit the first loop on the first spoke, then knit it, then knit the three loops (the ones that were formed during the first gain + the one that underlies the wedge) and another nakid.
This is a general wedge knotting scheme. All loops "wedge" here - facial. We always add in an equal number of rows. After two more rows between bows there will be 5 loops, then - 7 loops. We will stop at this, because 16 loops are enough for a thumb. 7 loops + 2 nakida = 9 loops. The remaining 7, we then pick up from the edges of knitting (photo 1).
Then we knit, no longer adding any knit and periodically trying on. We reach the base of the thumb. Here we need a large safety pin.
We knit the first loop of the needle number 1, which is not included in our gains. By the way, we started the “wedge” from the second loop so that there is no hole from the stretched loops between the needle No. 1 and No. 4. Then we remove 9 loops in the wedge to the pin, and add 4 loops to the working needle, on which one knit loop hangs, with nakida (loop 2).

It is 4 loops, because it is necessary to add half of the shots, to round down. Nakida in this case it is better to do with the help of air loops, as in the figure. Next, we knit by the pattern, knit nakida facial (photo 1).
And in the next row we knit these loops in two together. It was 4, it became 2. And all we had on the needle number 1 after removing the "wedge" on the pin was 10 - 1 (the basis of the "wedge") + 4 = 13. After tying the loops over the pin together: 13 - 2 = 11. So , in the next row approximately in the same place, it is necessary to knit 2 more loops as one, in order to return to the 10 original loops.
We knit further and try on. Go back to the gum (photo 2).

Next, knit gum 1 × 1, adding nothing and not diminishing. When the gum is the right size, you can close the loop.

On mittens loops can be closed with a pigtail. We returned after the next row to the needle number 1. We knit the first loop (it is our face). We also knit the second, wrong side, and then stretch it under the first. The first lies on top, and the second remains on the working needle. And then just as in the picture. The edge is beautiful.

Cut the thread with a margin and fasten with a hook. Go back to our thumb. One part we already have is 9 loops on the pin. Along the edges of the hole for the finger, evenly dial another 7 loops - a total of 16. The “Tail” of this set should remain inside the mitts. You can immediately fix it between the already connected loops, and you can first knit a row of fingers to understand where the gaps remain. They are very convenient to close this "tail." Distribute loops of 4 on the same 4 needles and knit facial. 5-6 rows are enough (photo 1). Then go to the 1x1 gum, knit several rows, and close the same way as the main part (photo 2). Mitty ready.

The right mitt will be different from the left in that the upper part will be in needles No. 3 and No. 4, and the last wedge on the needle No. 4 will be the basis of the wedge.
Pattern knitting openwork mitts for women
For the beginning of autumn or spring, when every woman wants her hands to be warm, but for mittens and gloves is already too hot, openwork mitts will do with knitting needles - a knitting pattern will help you create them yourself. This accessory will look great with a coat or jacket, a knitted coat or a cardigan.

Dimensions
Palm girth: approx. 20 cm;
Product length: approx. 20 cm
Materials
- Super fine yarn (100% wool; 400 m / 50 g) - 50 g black;
- stocking needles number 3.5.
Knitting patterns for schemes
Tracery pattern

Knit in a circle with needles No. 3.5 according to the scheme. The diagram shows only even (respectively, persons) series. In odd rows, knit loops and nakida. In purse rows stitches loops and nakida.
Sequence of rows
Run 2 times from the 1st to the 8th p., 1 time from the 9th to the 46th p. and 3 times from the 47th to the 54th p.
In the ranks from the 1st to the 8th and from the 47th to the 54th, start with loops before rapport 1, repeat rapport 1, finish with loops after rapport 1.
In the ranks from the 9th to the 46th to repeat rapport 2.
Knitting density
24 p. X 38 p. = 10 x 10 cm, connected with an openwork pattern with the needles No. 3.5.
Important make sure that the density of your knitting matches the given one (if necessary, change the number of the needles).
Working process
On knitting needles No. 3.5, freely dial into 2 threads (take one end of the thread outside, the other from the inside of the coil) 48 p. Spread loops into 4 needles (12 p. Each) and close into a ring. 2 p. knit double thread facial.
Work to continue with a single thread openwork pattern, performing rows in the specified sequence.
In the 36th p. The main loop pattern is divided for the thumb hole between the 1st and 4th knitting needles. Here on both sides add 1 chrome. and knit, continuing the pattern, ranks in the forward and reverse directions.
Run from the 37th to the 54th p. and added chrome. loop close.
Then re-knit in a circle and 2 times to perform from the 47th to the 54th p. In conclusion, 2 p. To twist double thread facial and loop to close freely.
How to tie baby mitts
For mobile and active children, mitts are ideal, because the movements of the handles are not constrained by anything. It is easy to knit baby mitts with knitting needles. Often, they are knitted with a set of hats, sweaters, leggings or scarves - so that the image of the child looks harmonious. But let us consider in more detail the process of knitting models of mitts for children, which will look equally good both on a girl and on a boy.

Dimensions
104/110 (116/122) 128/134
Materials
- yarn (50% polyacryl, 35% alpaca, 15% natural wool; 94 m / 50 g) 100 g turquoise;
- 50 g of beige and green;
- Knitting needles number 5;
- short circular needles number 5.
Knitting patterns
Facial surface
Front rows - front loops, purl rows - purl loops.
In the circular rows, all the loops are knitted facial.
Striped pattern
Knit the front satin alternately in 4 circular rows of turquoise thread and strips of 2 circular rows of beige, green, and again beige thread.
Elastic
Alternately 2 facial, 2 purl.
Working process
For each mitts with a turquoise thread, dial 24 (28) 28 loops on the stocking needles, distribute the loops into 4 knitting needles and knit 2 cm with circular rows in circular rows.
Continue to work with a strip pattern, marking the 8th paragraph and 17 (21) 21st paragraph.
For the top expansion, add in every 7th circle. on either side of labeled loops 3 (4) 5 x 1 p.
After 1 cm from the elastic for the hole for the thumb, divide the work between the 1st and 4th knitting needles, then knit in rows in the forward and reverse directions.
After 4 cm from the initial row again knit in circular rows.
After 10 (12) 14 cm from the gum with a turquoise thread, tie another 2 cm with an elastic band, then close all the loops.
Lesson step by step “how to knit men's mitts”
Men's mitts are also very popular, and will always be useful - after all, they greatly facilitate access to any handy little things. Consider a simple and affordable way to knit men's mitts with knitting needles. In this case, they fit in with an elastic band, therefore they are universal in size, as well as in taste preferences, since they look quite strictly and conservatively.

Materials
- Alize CASHMIRA yarn - 60-70 g (100% wool, 100 g / 300 m);
- stocking needles No. 2.75 (or No. 2.5);
- stocking needles number 3.
The number of loops corresponds to the male hand in the circumference of the base of the fingers 19-21 cm.
Working process
On needles No. 2.75, dial 60 loops, distribute on 4 needles and knit with an elastic band 2 × 2 12 rows.
Go to the needles number 3 and continue to knit 35 more rows.
On 1 spoke need to peremisti on a pin 10 loops for the future finger.
In the next row above the hinges retracted dial 6 loops. (removing 4 loops we make the hole for the fingers narrower than the base of the palm, where the thumb begins).
Continue knitting with an eraser for another 15 rows.
Go to the spokes number 2.75 and add another 12 rows. Close the loop.
Dial on the needles No. 2.75 left 10 loops for a finger, plus another 14 loops.
Knit a rubber band 2x2 14 rows.
Video tutorial for beginners
Here is another version of knitting mitts, this time in the Scandinavian style, rather warm and beautiful, with large embossed braids. The process of knitting is usually easier to perceive in video master classes, especially for beginners.
Video lesson on knitting needles mitts