At a theme evening in a kindergarten or school, the teacher can offer the child the role of a cockerel. In appearance it is a complex suit, consisting of many small details.
Do not be scared and run to the store to buy the finished product, because you can sew a cockerel costume for the boy with your own hands.
DIY cockerel costume for a boy: materials and tools
For independent sewing you will need the following tools and materials:
• fabric for the body of a yellow cockerel;
• fabric for crest and nose cockerel red;
• fabric for colorful feathers and tail tail cockerel green, blue and other colors as desired;
• wide elastic;
• lightning from 30-50 cm long .;
• scissors, tape, needle with thread, sewing machine.
Fabric choose dense cotton, satin or faux fur. If you want to add faux fur to your costume, but you don’t have enough in quantity, you can sew only some elements from this material. For example, the upper part of the wings or the back of the cap and shoes of the baby.
You can add jewelry in the form of thin tinsel wound around the neck of a child or sewn to the collar and shoes to the finished suit.
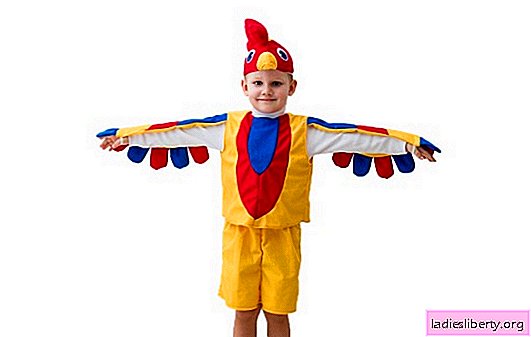
DIY cockerel costume for a boy: jumpsuit with wings

This costume is made in the form of overalls. It is interesting in that it has full large colorful wings, a beak and even legs. The wings are not sleeves, but rather an extension of the shoulder, so the child can control them, or maybe leave them alone and then they will simply hang down along the body.
Stage 1
Before sewing, take measurements from the child with a centimeter tape. Since the costume is a whole jumpsuit, you will need the following sizes: collar circumference, sleeve length (distance from shoulder to wrist), body length (from shoulder to knee), arm circumference plus 10 cm. For fluffy sleeves, leg circumference plus 15 see, hip circumference and chest circumference also plus 15-20 cm.
Stage 2
After taking all the measurements, proceed to drawing the contour of the parts on the fabric. In the process of drawing, resize according to the pattern. The drawing is applied to the fabric from the inside with a pen, pencil or soap.
Patterns for overalls will be as in the picture below. In order to cut out the details, the fabric is folded in two layers and a pattern is applied to the top layer. After that, the material is fastened with pins around the entire perimeter of the pattern, and then only cut out.

In parallel, a pattern is drawn for the wing, which is sewn separately and sewn to an already finished product.

Stage 3
Details are cut out of fabric and sewn together. You should get two parts on the front side of the overalls and two parts on the back side. Sew two halves from the front part first, and then two halves from the back part. Do not finish the back seam to the end, zipper will be sewn into it.
You should get front and back parts. Next, sew them together. To do this, fold them face-down together and stitch along the contour.
Then stitch the sleeve into the hole for the sleeve.
Stage 4
Sew a zipper into the back of the overalls so that the suit can be freely put on. The zipper should be unfastened from the collar to the waist, but not lower.

Stage 5
Tuck the cut edges (collar, sleeve and edge of the pants) one or two turns and sew, departing from the edge no more than 1 cm.
If desired, you can insert elastic into the sleeves and pants.
Stage 6
At this stage, you can start sewing the wing. Cut out all the details of the wing. For feathers, choose different colors, so the costume will turn out brighter. Sew together the semicircular details of the feathers by color. Turn the stitched feathers to the front side and iron.
Stage 7
Spread two bases under the wings on a flat surface and distribute stitched semicircular feathers along their lower edge. Hand-press the product with a needle and thread so that the feathers do not scatter when sewing.
Stage 8
Stitch together the elements of the upper part of the wing and iron.
Stage 9
Fold the wing base with its top face to face and sew along the perimeter. Leave the 15 cm length not stitched. Turn the wing to the front side through this hole and sew it with a blind seam. Iron the wing.
Sew the second wing in the same way.
Stage 10
Sew a strip of fabric at the level of the child’s hand onto the inside of the wing. The kid will hold on to this strip and flap its wings when necessary. The rest of the time, the wings will not interfere with him.
Sew the humeral part of the wing to the jumpsuit with not a large seam in two ties. It is necessary that the wing freely scrolls around its axis and does not deform.
DIY cockerel costume for a boy: hat with a beak

Sewing such a hat is not difficult, the main sign that this hat belongs to the rooster is the presence of a red crest, red earrings on the sides and a beak on the visor.
Stage 1
Measure your baby's head. For marking on patterns, you need to know the circumference and depth of the head.
Stage 2
Draw a rectangle on the fabric, the length of which is equal to the circumference of the head, and the height is 10 cm greater than the depth, crest, earrings in the form of an elongated drop and the beak of a cockerel.

Stage 3
Sew the short edge of the rectangle with each other. At the resulting circle, trim the top edge in the shape of triangles. Sew the cut corners together by inserting a crest in the middle.
Stage 4
Sew red earrings on the sides of the caps at the ear level of the baby. Sew a beak to the front of the cap.
For crest, beak and cockerel earrings, you can use red felt fabric. The big plus of this fabric is that the cut edge is not processed and does not tuck.
DIY cockerel costume for a boy: shoes in the form of paws
Even the simplest version of shoes for a cockerel costume also requires taking measurements. For sewing you will need a piece of thick cardboard, yellow or orange fabric and elastic.
Stage 1
You need to find out the length and width of the baby’s foot, as well as the height of the shoes to the ankles.
Take measurements from the child’s feet and apply it to the fabric. Outline the parts according to the following sketches.
Stage 2
Cut out fabric parts. On the upper part of the shoe, cut a round hole for the foot with a fringing. It can be cut into strips of the same fabric as the shoe parts. Insert the gum under the trim and sew the edges.

Stage 3
Sew the upper and lower part of the shoe between each other along the contour.

Turn the resulting foot out. Do the same with the second boot.
Stage 4
Cut out the shape of the foot from the cardboard and insert it into the shoes. This layer will help keep the shape of the boot. Wearing such shoes is better with socks or tights.