In winter, real challenges come for birds.
The earth is covered with a thick layer of snow and food has to be obtained with great difficulty. Many birds cannot stand this natural selection.
Therefore, today's master class is dedicated not only to bird feeders with their own hands, but also to the sincere care of a person for his lesser friends.

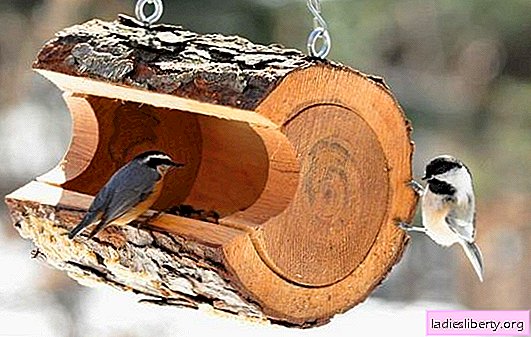
DIY bird feeder made of wood
A wooden feeder is a classic option. Most often it can be seen on the street in the courtyard. They appear there thanks to the care of schoolchildren and their teachers. Most often they use plywood. It is pleasant to work with this material: lightweight, durable and can be bought at any hardware store.

Materials and tools: plywood, wooden slats 20/20 mm in size, emery paper, glue, screwdriver, screws, jigsaw for cutting parts out of plywood, pencil, ruler, gloves and glasses for safe work with a jigsaw.
Stage 1
Structural elements are drawn on a plywood sheet: 2 roof slopes, floor.

Stage 2
Do it yourself with an electric jigsaw. The edges of the blanks are sharpened with sandpaper.
Stage 3
From wooden slats, columns for a bird's house are cut. Edges are treated with sandpaper.
Stage 4
All joints of the elements are glued, and then with screws. It is recommended to drill a hole for it with a drill before installing the screw. This will prevent the wooden parts from cracking and splitting during screwing. The diameter of the drill should be slightly less than the diameter of the screw.
The assembly of the feeder starts from the floor.
Stage 5
The house is hung on a tree so that yard cats could not get it. It is not enough to provide the birds with food - we need to think about security. The height should be such that you can come up and clean the house, put a new portion of food.
DIY bird feeder out of the box
Such a feeder is made from any box of juice, milk or kefir. This craft will be mastered even by a three-year-old baby under the supervision of an adult, when it will be necessary to use scissors in work.

Materials and tools: box, scissors, rope, felt-tip pen.
Stage 1
A suitable box is cleaned and washed, and then dried.
Stage 2
Using a felt-tip pen, future holes are drawn on it. You can dream up: come up with doors, windows and a pipe.
Stage 3
Marked holes are cut with scissors.
Stage 4
Do-it-yourself bird feeder is suspended by a rope, for example, outside a window. There it will be easy to lay food every day with your own hands and watch the birds from close range.
DIY bird feeder from a plastic bottle with a spoon
This feeder is made from a small plastic bottle for water. Its only drawback is the lack of a roof. Therefore, it must be suspended under a natural shelter: the roof of the house or a large spruce.

Materials and tools: plastic bottle, two wooden spoons, scissors, hook for hanging bottles, rope, glue, thick needle, bird food.
Stage 1
A small bottle is washed and dried.
Stage 2
In plastic, scissors make holes for inserting spoons. They should be inserted at a slight angle. This will allow the feed to naturally sleep from the feed itself, as shown. The hole over the wide part of the spoon should be larger. Otherwise, the feed will not get enough sleep. It is recommended that you first make a small hole, sprinkle the groats, and, if this is not enough, enlarge the hole.
Stage 3
Using glue, the spoons are fixed on the frame of the bottle. So they will not turn over in different directions when the birds sit on them.
Stage 4
Holes are pierced in the bottom with a thick needle. This is necessary for the outflow of unexpectedly appeared water or moisture.
Stage 5
A metal hook is screwed into the plastic cover. And for him, a do-it-yourself feeder is suspended on a rope for it. Feed is poured inside.
DIY bird feeder and large plastic bottle
Such a feeder has several advantages: a large hopper for filling with cereals, excellent protection against moisture and snow, ease of manufacture and use.

Materials and tools: plastic bottle 5 l., plastic bottle 1.5 l., scissors or knife, rope, felt-tip pen, adhesive plaster.
Stage 1
Felt-tip pen draws lines on a 5 liter bottle. for a bird's eyelet. They should be large enough to fit inside a 1.5 liter bottle. Too large openings will allow snow to constantly get inside.
Stage 2
Doors in the shape of the letter "P" are cut out in the bird feeder with their own hands. Doors bend up, as in the photo.
Stage 3
The birds have a very tender cornea on their legs. The lower part of the doors - the threshold - must be glued with adhesive tape.
Stage 4
A 1.5 liter bottle is taken. She cuts the bottom and neck. The cut off neck is turned over and inserted back. The lid on it should be twisted. The resulting design is inserted inside the large bottle with the lid down. Holes pierced above it so that the feed could spill out to the bottom of a large bottle. The number, size, height of holes above the bottom are determined independently.
Stage 5
Feed is poured into the feeder. It is suspended by a rope, for example, on a tree.
DIY bird feeder from a store blank
And finally - the easiest craft. It is enough to buy a ready-made feeding trough in the store and decorate it. Use only acrylic paints. You can use gouache, but after a year all the colors on it fade. The house will lose its luster and beauty.

Materials and tools: preparation of feeding trough, acrylic paints, brush, pencil, washing gum, colorless varnish on wood, paint brush.
Stage 1
First, the contours of future flowers and twigs are drawn with a pencil. This is because the applied acrylic paint cannot be erased. It is applied once and for all, dries quickly.
Stage 2
At this stage, the bird feeder is decorated with colored paints. Since they dry quickly, there will be no problems with mixing and blending.
Stage 3
Although the paint has a good resistance to fading, it is necessary to apply “colorless wood varnish”. She will save the picture from scratches and chips, when small birds claws cling to the house. It is recommended to apply the varnish in three layers, allowing each layer to dry beforehand.
The feeder is ready!