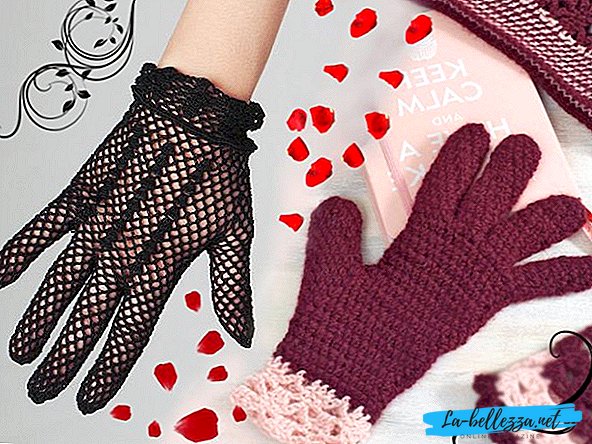
Gloves are a beautiful and useful thing. They can not only warm, but also decorate, make the image more refined, calm, or vice versa - bright, catchy. Especially a large variety of models for all seasons and occasions offer crocheted gloves, which create a worthy competition to the models created with knitting needles.
It is due to this method of execution that gloves can turn out both thick and textured, as well as the finest, openwork. Of course, the chosen factor will be the chosen yarn - it is responsible for the heat, thickness and the degree of openwork of the product. Such a variety of knitting opportunities allows you to get equally beautiful gloves for women and for girls, comfortable and practical gloves for children, and warm gloves for men.
Crochet gloves - scheme and description
Let us consider in more detail the most common options for crocheting gloves, including the knitting method for beginning needlewomen. We also learn how to crochet mitts - gloves without fingers, and analyze in detail how to knit men's, women's and children's gloves.
Knitting for novice needlewomen

Crochet gloves provide the possibility of creating a rather thin, but dense and warm products. Let's try to create one of these, while performing a simple pattern of the same type.
Crocheting gloves for beginners begins with definitions hand measurement. You can do this as follows: circle the palm with a pencil or pen on a piece of paper. Now, in accordance with the scheme, we measure the following indicators:

A - palm width at the base of the fingers (approximate width of our gloves); B - the distance from the base of the palm to the bend of the thumb; C - the distance from the base of the palm to the tip of the middle finger (length of the glove without a cuff); D -distance from the base of the palm to the base of the little finger.
Materials for work:
- jersey;
- hook number 2.5.
Working process
We collect a chain of air loops of equal wrist circumference + 1 cm for free putting on gloves. We join the chain into the ring with a connecting column and to start knitting the first row we make 3 air lifting loops.
First row knit art. with / n and finish the row with a connecting loop in the last loop of the climb. Next for knitting second row make 2 lifting air loops and knit a pattern of elastic, alternating convex and concave embossed columns. Complete the row also with a connecting loop. Following rows knit gum as well as the second. The cuff of the glove is gummed with a pattern, at your discretion, can be of any width from 4 to 6 cm.
Then go to knitting the main part of the glove. We knit the glove with semi-columns in circular rows in a spiral, that is, do not make a lifting loop, then the seam of the initial loops of the row will not be visible.
For yourself, mark the sides of the glove, where the thumb will be located, and where the little finger.
Having connected 2-3 circular rows with semi-columns on the side of the side of the thumb, we begin to make additions for the wedge extension of the thumb. To do this in the next 5-7 rows, add one half post, knitting two out of one loop.
When the knitting height reaches the base of the thumb in the last row, without reaching the edge of 6-7 loops, we assemble a chain of 8-9 air loops and fasten it into the arch through 12-14 loops of the previous row. Thus, a hole for the thumb, which fits in the last turn.

Next, knit in circular rows the main part of the glove before the start of the little finger. Do not tear off the main working thread, but by tying it to the side of the thumb, pull the big loop so that the knitting does not break.
Calculate the loops for each finger before starting to finger the gloves. You can identify them by trying on a glove and noticing the loops on the inside and outside. To knit the little finger, attach the thread from the side of the palm, make 3-4 air loops and attach the arch to the back of the glove. Next, knit a circle of semi-columns to the height of the little finger.

Closer to the tip, make a decrease on both sides of the finger to narrow. When the finger is tied up to the full height, close the loops, tying round the columns without crochet - one of the two loops. When the hole narrows, cut the thread, fasten it by stretching the tip through the loop. Thread the needle into the remaining tip of the thread and ditch the remaining hole; thread the thread inside out.
If you look at your hand, you will see that the fingers are located at different heights of the first little finger, just above the index finger, and the middle and ringless fingers on the same level. Therefore, after knitting the little finger, go back to knitting the main part of the glove. Taking the left thread into work, tie one circular row with semi-columns on the inside, the arch at the base of the little finger and the outside of the glove. Now you can knit ring finger. Attach a new thread to the inside, tie a chain of 4 air. eyelets and fasten the arch on the outside (photo 1).
Knit semi-columns to the height of your finger, in the upper part narrow it, making it decrease on the sides. Finish knitting in the same way as on the little finger - do a subtraction, tying together two columns without a nakida, until the hole narrows to a small hole.
Again, take the left thread of the main part to work and knit one circular row through the arch of the ring finger. Next, attach the thread for knitting the middle finger. If at the base there is a big hole for a finger, then make a decrease in the corners, tying two half columns together (photo 2).

Knit the index finger with the left thread from the main part of the glove. Attach the knitting thread of the thumb and knit around the half-column, making a decrease first at the corners, tying two half-columns together until the hole is equal to the diameter of the finger. Next, knit it to a height and narrow the columns without crochet.
The glove for the other hand is knitted also, but in mirror image. The back part can be decorated with a knitted flower or embroidery.

Fingerless model

Very popular nowadays fingerless gloves, also called mitts, allow you to drive and use the phone quickly and without discomfort. In addition, the knitting process of this model is much easier than knitting simple gloves - because here you do not need to work with each finger separately.Types of mitts there are many, as knit them for the summer season, and for the winter. Let's take a closer look at how to crochet gloves without fingers, which look very impressive in autumn and winter.
Materials for work:
- Yarn ADELIA Jessica (67% wool, 33% polyester, 260 m / 100 g);
- hook number 3.
Working process
First you need to dial a chain of air loops of such length that in it, folded in half, easily held four fingers. Knit the mitt will be from top to bottom - from the fingers to the wrist. Close the chain into a ring with a connecting post, tie up two lifting air loops and then three rows of single crochets (photo 1).
Next, go to the knitting puffy columns. A lush column is three or more "not connected" double crochets, knitted at the end in one loop. In this case, the magnificent columns consist of three "incomplete" double crochet columns. To make a lush column, we make a nakid, enter the hook into the loop of the previous row and pull the thread. We knit the thread in the resulting loop and nakid (photo 2).

On the hook - two loops. Again, we make a cape and again, we will “fail” a simple double crochet (photo 1). On the hook - three loops (photo 2). Repeat everything again - there are four loops on the hook (photo 3). Finally, we knit all four loops at the same time (photo 4). Lush column ready!

We knit three rows of magnificent columns, then three rows of columns without a nakida, then two more rows of magnificent columns. In principle, the alternation of different matings can be any - it all depends on the taste and desire of the knitter.
We walked to the bottom of the thumb. We tie a chain of fifteen air loops and attach it with a connecting stitch to the main knitting through four loops from the beginning of the chain. Let's try on a mitten - the thumb should pass freely into the hole intended for it. If the hole is smaller or larger than you need - change the length of the chain (photo 1).
We continue knitting in a circle with single crochets - only the row is longer by fifteen (in this case) loops. Here it is more convenient to knit in a spiral, without lifting loops (photo 2).

After knitting two rows with single crochets, we begin to make a subtraction. It is best to do them like this: evenly reduce four stitches in a row - the next row to knit without reductions - again reduce four loops - again knit a row without reductions. There were four rows with reductions. Having finished to subtract, we will tie another four to five rows without subtractions. Finish knitting five rows of embossed columns.

The details remained: the upper part, as well as the hole for the thumb, can be arranged with a “picot” next to it, having previously knitted two or three rows of columns without a single crochet. We tie the second mitten in the same way as the first one. A pair of fingerless gloves is ready!
Master class - how to tie men's gloves

As a good gift for a dear person, you can crochet men's gloves. This does not take much time and effort, especially if you work according to a crochet-knit master class. In this case, it will be a question of beautiful gloves, which will look great in monochrome moderate colors, preferably black, gray, dark blue.
To begin with, you should also circle the outline of a man's hand on paper, or measure his old gloves.
Materials for work:
- fine acrylic or wool blend yarn;
- hook № 2-2,5.
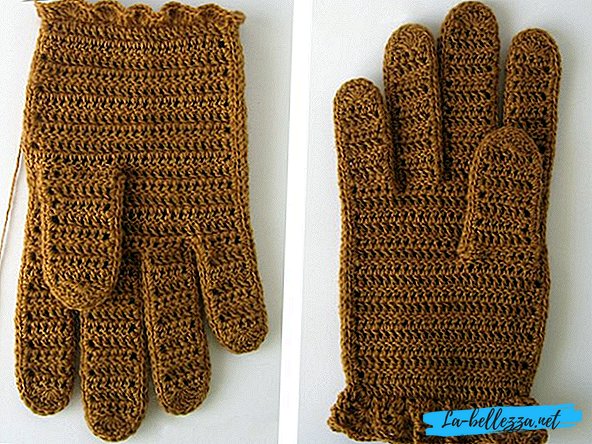
Gloves knit in the transverse direction from the little finger to the thumb. One glove consists of two parts: the back with four connected fingers and the inside with a knitted fifth thumb. We sew the finished halves of the glove, finally, tie the cuff along the bottom with a rubber band from the embossed columns.
Working process
The initial chain of air loops dial length from the beginning of the cuff to the tip of the little finger on the pattern. Next, knit rows with crochets with the width of the little finger. Each new row of columns begin with one air lift loop.
When knitting columns b / n in the direction of the fingers, tie up to the base of the ring finger and dial a chain of air loops to the tip of the ring finger.

Next, knit rows of art. b / n the width of the ring finger. Also tie off the middle and index finger. The back of the glove ends after tying up the index finger.
The inner half of the glove fits just like the back to the middle finger. At the beginning of knitting the index finger, in a row of posts in the direction from the cuff to the fingers, tying the posts to the base of the thumb, dial a chain of air loops equal to twice the length of the thumb. Close the chain into a long loop, continuing to knit the columns along the row to the base of the index finger, then dial the chain of air loops for the length of the index finger.

Tie several rows of crochets without crochet, first along the chain of the index finger, along the row of the brush to the loop of the thumb, then along the chain of the thumb and then to the cuff. Turning the work, knit the posts in the opposite direction until you tie the strips to the width of the index and thumb.
Put the two halves of the glove back and inside together. You can connect them by crocheting a row of connecting posts along the contour, or just sew with a needle, also sew the sides of your thumb. Turn the sewn glove onto the other side so that the seam is inside.

At the bottom of the glove, first knit a row of crocheted columns, then two rows of embossed columns alternating convex and concave. Knit the second glove in the same way, only when stitching, place the parts so that the thumb is on the other side.

How to knit openwork gloves for a woman

To replenish the wardrobe with gloves is always a great idea, because they warm the hands and give perfection to the female image in the cold season. Do it yourself with the hands under the force of even needlewomen without great experience, you only need to choose a detailed knitting pattern with a description. Consider how to create crochet openwork gloves with step-by-step photos.
Make measurements
Using the method of measuring the hand indicated at the beginning of the article, we determine the size of future gloves. Now you need to calculate the required number of loops. Usually, in the descriptions of knitting gloves mention how many loops the sample contains 10 * 10 cm. However, you can make it easier: tie a small sample (10-15 loops, 4-5 rows) and find out how many elements are in whole centimeters.
In this case, 1 cm is 3 double crochet, that is, initially 3 air loops. The width of the glove is 8 cm, which means 8 * 3 = 24 (one more loop is added for the symmetry of the pattern = 25).
Gloves knitting scheme
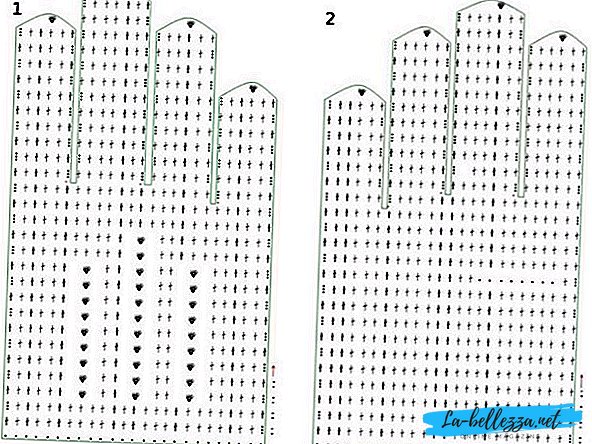 Fig. 1: Pattern of knitting the top of the right glove; Fig. 2: The scheme of knitting the bottom of the right glove.
  Fig. 1: Knitting thumb glove; Fig. 2: Pattern knitting gloves cuff.
Working process
Begin to knit the upper part of the glove of the right hand. We collect a chain of 25 air loops + 3 air loops to go to the next row. Knit 2 rows with single crochets in each loop (photo 1).
In the third row we knit 6 double crochets, then we begin to knit the pattern: we skip one loop, next we knit a “fan” of six double crochets, skip one, and two double crochets. Repeat the pattern element 2 more times and end the row with double crochets (photo 2).

Knit another row with an element of the pattern in the middle. Then 2 rows with single crochets. At this stage, the length of the part must be equal to the distance from the base of the palm to the base of the little finger (d).


In the next row we leave room for the thumb. We knit 2 double crochets, skip 8 loops (or as much as you need, try on) we knit a chain of the same number of air loops over them and continue to knit with crochets. In the next row in each loop of the chain we knit 1 column with crochet.


Как вязать детские перчатки

Еще одна интересная модель вязаных перчаток - тонкие ажурные. Они подойдут как для девочек. так и для девушек. Красивые, легкие, нежные - они прекрасно подойдут под красивый наряд на утренник, выпускной или любое другое торжество. Научиться вязать детские перчатки крючком поможет подробный мастер-класс.
Materials for work:
- хлопчатобумажные нитки №30-40;
- крючок №1.
Working process
Начинаем вязание перчаток с пальцев. Для этого в начальное кольцо провязываем 8 ст б/н, стягиваем кольцо, делаем соединительную петлю в первый столбик и начинаем вывязывать арочками из 3-х возд. петель по кругу цилиндры обвязывая указательный и средний палец, примеряйте вывязываемые цилиндры и делайте прибавления арочек к основанию пальца.
Готовые цилиндры на указательный и средний палец соедините, и обвяжите вокруг 1-2 рядами основного узора.
Следующий цилиндр на безымянный палец, так же присоедините к стороне среднего пальца и обвяжите вокруг теперь уже 3 цилиндра.

Затем очередь за мизинцем, присоединив цилиндр мизинца, обвязывайте вокруг ладонь основным узором, не забудьте примерять перчатку во время обвязки и если необходимо делайте убавления арочек между пальцами с внутренней стороны ладони.
Довязав перчатку до большого пальца, присоедините связанный цилиндр и продолжайте обвязку, делая убавления по одной арочки в каждом ряду с внутренней стороны ладони от места присоединения.

Довязав до конца ладони, перестаньте делать убавления и вяжите по кругу до необходимой длины перчатки, затем обвяжите край красивой каймой по этой схеме:

Video lesson
Быстрее освоиться с техникой вязания перчаток крючком начинающим рукодельницам поможет видео мастер класс. Это сэкономит время и убережет от возможных ошибок новичков. На видео представлен вариант вязания митенок-варежек - еще одного интересного способа совмещения перчаток, митенок и варежек.
Видео урок - как связать перчатки крючком